3.3 Product Shoot - Images For Final Selection

Here they are then, the 16 images, narrowed down from an original total of 105 images.  Only 10 can make the final cut and here comes my rationale for each picture (expressed before each picture).


This one makes the cut. I love the shadows and highlights. The crossbar is white, the shadows are black and shades of grey the midtones are all still in play. The movement lines added in PhotoShop encourage our eye to where the action is. The positioning of the players simulates real life yet the colour saturation (learned from my tilt-shift research) assures us that these are model players. The goal posts provide a nice framing for the action too. The narrow depth of field adds to the tilt shift effect (no additional blurring in CS4). The player (figure?, subject?) heading the ball is in focus again leading us to where the action is. The base of the player mid left hand side is slightly distracting but gives a reason for the man on the post. I love that, just as in real life, there are lots of pieces of action. The keeper is starting to 'go the wrong way' in front of the player handling the ball two opposing players 'face off' whilst elsewhere jostling occurs. The purpose was to create a nostalgic effect through simulation of real life events - I believe this picture meets that objective bang on.


Given the nostalgic the theme I went for aging this shot. I converted it to B&W in LightRoom, then played around with the curves and clarity, before adding a duo tone effect. This makes the cut also. This is a real high contrast image with grain, it harks back to the 50's and 60's which fits well with the goal type (very old first division) and floodlight stanchion (no advertising on the shirts either!). The players form a triangle that narrows towards the keep and brings our eye through the picture. It immediately speaks of nostalgia, of an innocent time, yet it is soft and unchallenging.


Our survey said XXX (family fortunes reference). Yep the focus is on the action, yet the angle is too low. We have a jumble of players framed by the goal. However, that patch of white behind the goal is to distracting (the Subutteo box - lesson learned for all future shoots - REMOVE EVERYTHING FROM THE AREA THAT IS NOT MEANT TO BE IN THE SHOOT - basics I know, but I learned).
So it's no no no.


I like this shot. I probably shouldn't but I do. I like the way it is framed and the use of natural colours, the sharpness the clarity. However, they are also it's undoing - it speaks of now and not of yesterday. So it's three nos' I'm afraid.


This is the first image in B&W, another version follows later with a duo tone effect. Now I love the shadows. The players have multiple shadows and it simulates the same effect we'd see on the Midweek Match (if you could get away with staying up on a school night). However, I don't believe there's room in the final 10 for 2-3 B&W images and I much prefer the high contrast shot so It's three falls or a submission and I've thrown the towel in (wrestling references - Shirley Crabtree, god bless him - waiting for the 'Classified Results and Pools Check').


I'd rather hoped this would work, the close in shot, the long shadows of the players, the scramble of the players watching as the tension builds on the penalty taker. Sadly it just doesn't work. I think it needs the large open goal with the goal keeper poised - the open space reaching up to the penalty taker to make it work how I'd want it.


So 3-2-1, dusty bin (Ted Rogers king of the fingers).


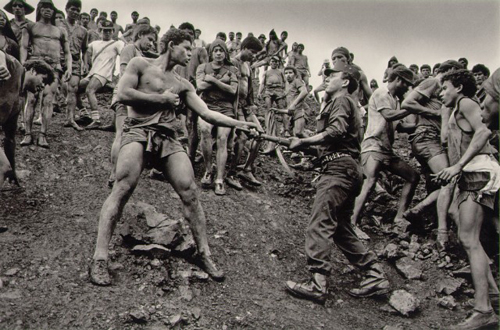
This following type of shot makes up the remainder of the selection. It was the original intention to merge model and real life to create the feel of nostalgia with the additional real life crowds. As children our vivid imaginations added the crowd and noise in for us. In adulthood we have filtered out our 'childish ways' so putting in real life substitutes completes the memory. There is a 'face off' between two players, that's the immediate situation. I also love the shadows (a suggestion of floodlights) and the texture of the Subutteo pitch comes through (which dates it c1970's). In one.


Here's the duo tone that I mentioned earlier. I like for the same reasons as the earlier image, however, also for the same reasons it's not in the final round - but it was 'smashing super great' (Jim Bowen at his finest).


A half decent attempt that almost makes the cut because it meets the criteria for the merging of reality and model life. The inclusion of a Subutteo ball at full size, the action pose, lighting, shadows and tilt shift effect all help. However, the crowd backdrop is just to flat and affects the whole image. Two yellows rather than a straight red, but either way it's sent off.


One of my favourites. The crowd shout is fairly realistic and I've blurred it enough to support but not distract. There's action, the keepers diving (there could be a hand at the other end of that rod) but too late the ball's in the net and the blue player is already turning away to make his goal celebration. Good shadows, great texture on the pitch and nets, nice highlights on the goalkeepers base, nice whites on the goal posts, good colour saturation (tilt shift motif). You're going through.


Close to a favourite. love the lighting, love the shadows love the added action. Nice and sharp where it needs to be. Disappointed with the crowd angle and blurring. Time has run out for the C&G but I will fix this for the 'client'. It's in the final selection because it meets the original criteria.


Probably the best shot in terms of matching crowd and models. It's quite realistic. Good colour saturation and good focus on the jostling players. Decent lighting with good whites and shadows. Again, some good pitch texture. It makes the squad (yep enough 70's TV references - the world cup's coming don't you know).


Another 'face off' between two players with a much better crowd background. The addition of a third player coming in from the rear adds to the tension of the situation.  Again great texture of the Subutteo pitch. the band of sharp focus leans towards tilt-shit imagery.


This one really works for me the players celebrate a goal in front of the crowd while the crowd celebrate in the background. Good focus and texture, well lit and the 'triangle' of players becomes our immediate focus of attention.


This I love because it immediately conveys those smokey European nights at the San Siro (although this is the Nou Camp - or Camp Nou for aficionados). There's real tension, a player is injured (or is he feigning - in Subbuteo rules no doubt, if he's over it's a foul), the focus is actually on the players heated debate (a recent phenomena unless you can recall Keegan and Bremner). We then see the player on the floor. The blurred players draw our eye to the main action. The stadium lights (burnt out as they should be) match nicely with the lights on the pitch. Love it me.


And that's all folks!

4.1.2 Portrait Shoot Planning & Storyboard

The storyboard consists, of the following 10 shots.

In order of shoot, they will be re-arranged for the storyboard after the shoot (see comments at end of list);
  1. Model standing in traditional dress facing forward (for half and half image - both face and full length) - Also capture hard/defined shadow.
  2. Model sitting on chair in traditional dress (face forward)
  3. Model sitting on chair in traditional dress (side on)
  4. Model walking in traditional dress (towards future self) (towards camera)
  5. Model walking in traditional dress (towards future self) (sideways to camera - left to right)
  6. Model making traditional greeting (towards future self)
  7. Model, in traditional dress, holding hands with future self
  8. Model disrobing traditional dress e.g. removing headscarf or letting hair down, as she walks towards future self
  9. Model standing leaning against white wall, in business dress (face forward and side on)
  10. Model walking in business dress (towards future self) (towards camera)
  11. Model walking in business dress (towards future self) (sideways to camera - left to right)
  12. Model, in business dress, making handshake with future self
  13. Model, in business dress, holding hands with future self 
  14. Model standing in business dress facing forward (for half and half image - both face and full length)
  15. Shot of traditional shoes (table required)
  16. Shot of business shoes (table required)
  17. Shot of business bag (table required)
  18. Shot of business phone e.g. Blackberry (table required)
Comments
Positioning for shots 1&14, 6&13 and 7&12 will be critical for matching up. Same focal point, distance from lens and lighting.

The model may choose to start in business dress and then move to traditional dress so the order of shots will need to be flexible (considerations of make-up etc). I could ask in advance of course, however, its part of my plan to help the model feel comfortable on the day by involving her in the shoot. Naturally, I'll be taking advice from her as regards to the 'poses' to be adopted. The model is a passionate member of 'Women In Logistics' and as such is 'surrogate client'.

4.1.1 Potrait Shoot Statement of Intent UPDATED

Title of Theme: Women In Business


Statement of Application
The influences behind my choice are included in blog 4.1.1 My Portrait Theme Choice. 


My vision for the final outcome is to produce 10 shots that could be used in a promotional campaign for a fictitious organisation 'Women In Business, loosely based on the real organisation 'Women In Logistics'. The shoot needs to produce images that could/would/will be used in an advertising campaign in business journals and websites.


The common theme relates to the challenge/s  of the duality of culture, heritage and the expectations/requirements of an increasingly global business world. 


The fictitious organisation would understand the unique challenges that women face and offer to be there to support them, not just as business people but, as the unique and individual person that each woman is.


The approach contrasts a Woman in traditional Indian dress with the same woman in typical western business dress. In this way the theme also touches on (without making direct reference to) the additional challenges of culture and race.


Equipment Used
A full description of the equipment used can be found on the Blogs relating to lighting and equipment.


Health & Safety Considerations
A review of H&S considerations and assessment of risks is covered in blog 9.0 Health & Safety.

1.0 The Journey So Far

Having joined the C&G L3 course without any prior qualification (an unfinished C&G at Derby some years ago not counting) it felt right and proper to provide some evidence of prior experience and thought. Throughout section 1.0 I will provide commentary on my learnings, both historically and now, as they develop on this journey.

Steve Davies (tutor) strongly suggested I start with L2 - but having read the course content I knew I wanted to go with L3 - I wanted to push myself hard (I wasn't to be disappointed)

I recall Cartier-Bresson saying that he saw the picture in his head and then waited for the moment to come along. This he called the decisive moment and it is beautifully illustrated by the image of man jumping a puddle.


Cartier-Bresson says he waited hours for this moment to arrive. I have practised this technique and had great success.

I also recall Doisneau's images and discovering that they were posed. The image of a bride & groom crossing the road to a bar (in full regalia) had always struck me as beautiful. Here he does it again with this evocative image of dancers.


Discovering that this was not an 'opportunistic' nor 'decisive' image but instead a 'staged' image has removed none of it's magic. I believe that they are all equally valid methods of creating beautiful images.

Replicating Doisneau - I have to admit that I didn't purposefully go out and replicate these - but here it is - uncanny eh!


3.2 Processing The Subbuteo Shoot Images

This section highlights the process and key techniques used to take the original images and merge them with real life images of various stadia to create the final 'reverse tilt shift' images.


A long search was undertaken to find suitable 'background' images - size, scale and orientation of the crowd / stadia were key considerations. A shot that included the goalmouth needed a crowd image that was also located behind the goal and likewise shots taken across the breadth or corner of the pitch.


Some of the following pictures will show the plan to use the model floodlights in the images by masking in lighting. However, whilst the process worked reasonably well I was unable to bring the floodlights in to the final image in a way that was acceptable.


Whilst I have developed 10 images, many of them use the same techniques. For this reason I will highlight the work flow and key processes used.


All images were shot on RAW and imported in to LightRoom (L2) - were I would also normally do my image processing. However, as L2 is my 'library' tool that's were all work flows start. The images were then immediately exported to PhotoShop for a whole load of manipulation.


For all images they start with the same first steps;
  • Open the image
  • Open the carefully selected stadia background image
  • Drag the background image in to the core image creating a new layer
  • Select free transform
Adjusting the background layer takes time and personal judgement. In the above image you can see a brown band that is edge of the table (see Subutteo Set Up). This needs to be removed. There is also a judgment to be made about where the edge of the background image will meet the edge of the Subutteo pitch. I wanted to keep the Ground Stewards in (adding to the reality) but remove the 'real' balls and the 'real' pitch.

In the following image I have adjusted the opacity of the background image to make it easier to align the edges. This will also help with blending later.
Having aligned the edges I needed to;
  • Bring forward some background (I want the crowd - around the two players at the top of the image)
  • Bring the hoardings up to the edge of the Subutteo pitch
  • Keep the players (in first step you can see that the players have a transparent aspect to them).
The approach involved use the eraser tool to either remove the background or bring in the foreground.
I then used 'Lens Blur' to match the blurring achieved in the product images by use of shallow depth of field. A bit of a tweak was also required on the background opacity.

In the following image the lightness of the box behind the goal is distracting. I created a 'Pattern Stamp' that could be used to replace this section.


You can see in the above image that the players are now glowing like the 80's Ready Brek children.


I used the same technique with a much smaller brush close up.


You may recall I decided not wanting the Subutteo Floodlights in the shot. To remove them I applied a copy layer to the core image and then a quick mask.


Making The Ball Move
Now, anyone who recalls Subutteo will also recall that the ball was as big as the players. In the final shots I want the ball to be more 'life like'. Also, as the images are all 'stills' I wanted to create the impression of movement. Here's my solution.


I'd planned the final image in advance. I'd positioned the players to simulate a goal being scored from a 'header'. I'd also taken shots of the ball in isolation.


As you can see in the above shot I used the 'Magic Wand' tool - with a low tolerance - to select the ball. I then used the 'Move' tool to transfer in to the chosen image.


'Free Transform' and a process of trial and error was used to get to the final position and size right.


Now to get some movement. Firstly I copied the same ball in (adding another layer).


I then used a combination of motion blur and 'stretching' the image to create the motion effect. Getting the angle approximate the required trajectory - heading towards the roof of the goal.


Again the iteration of trial and error was used to get both ball size, amount of blur and stretch right. Stretching the ball (using Free Transform) also caused the ball image to fade and this had to be factored in to the amount of blur used.